Wet Rooms – Tips and Tricks
The application of Stuccos to showers and wet rooms is among the most ambitious challenges of plaster finishing. There are many issues connected to it, and as we will see, the solutions are few.
PROBLEMS THAT MAY OCCUR
- Carrying out work in wet areas requires the substrate to be very stable. Flexible membranes and substrates, and expansion and contraction of timbers behind boards will cause issues. You can waterproof everything perfectly but one crack in the plaster will compromise the finish, allowing water ingress and potentially making the plaster fail. If you have suspicions that there may be issues, then mesh coupled with Anti-Crack Plaster is one way to overcome them.
- With reference to flexible adhesive and membranes – these are designed for tiling, not for plaster finishes. Plasters are too thin to be applied to such a soft surface and will inevitably crack when applied directly to these.
- The shower enclosure has two delicate points.
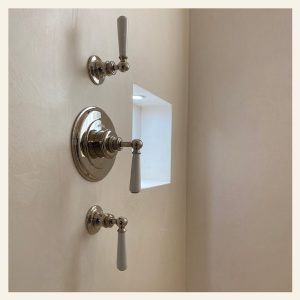
▪ The first is the area around taps and fittings. When we apply lime-based plasters in showers, we must prevent the water from slipping behind the rings of the faucet handles and tap. When it penetrates, it slips inside the plaster substrate creating spots around and under the handles.
▪ Secondly is where the plaster meets the shower tray – damp and dirt can accumulate in the seal between the wall and the shower tray causing mould stains.
OTHER CONSIDERATIONS - Not all plasters are suitable for showers and wet rooms. Marmorino Fine and Grassello do not waterproof well. We do not advise using either for wet areas.
- Ideal plasters for wet areas are Tadelakt, Pastellone and Marmorino Carrara Medium or Coarse.
- Make sure to use a smooth plaster – coarse or textured stuccos will allow a build-up of moisture and body fats in the profile that will encourage mould growth.
- Many plasters can be waterproofed for exterior but may develop issues in a shower enclosure. The problems created by shower enclosures are because they struggle to dry in the corners, in the lower parts, and in general they are environments with little air circulation. The prolonged wetting of a plaster generates irreversible dark stains due to the accumulation of salts in the surface layer of the stucco.
SOME SOLUTIONS - If you find yourself faced with a flexible membrane then we would firstly recommend the use of our fibrous Anti-Crack Plaster. However, covering it with a coat of a this before applying the stucco is not enough to prevent its cracking. This is because every shower box has a weak point: the tap handles. When fixing the handles, a ring is screwed into the wall exercising strong pressure against it. As a result of this pressure, the plaster around the handles cracks and breaks. Furthermore, if the plaster coat is not strong enough, cracks can eventually occur all along the walls. The simplest solution to this issue is to apply a first coat our Anti-Crack enriched with Strong Adhesion Additive (SAA). The use of SAA results in a greater adhesion to the membrane. Once dry, apply a polyester or fiberglass mesh (180 gr per square meter) on the tap handles area, and fix it to the surface using the same Anti-Crack Plaster. When this second coat is dry, apply once again the same mesh to the entire shower wall, fixing it with Anti-Crack Plaster. Finally, when the third and last coat is dry, you can directly apply your stucco on the shower box walls.
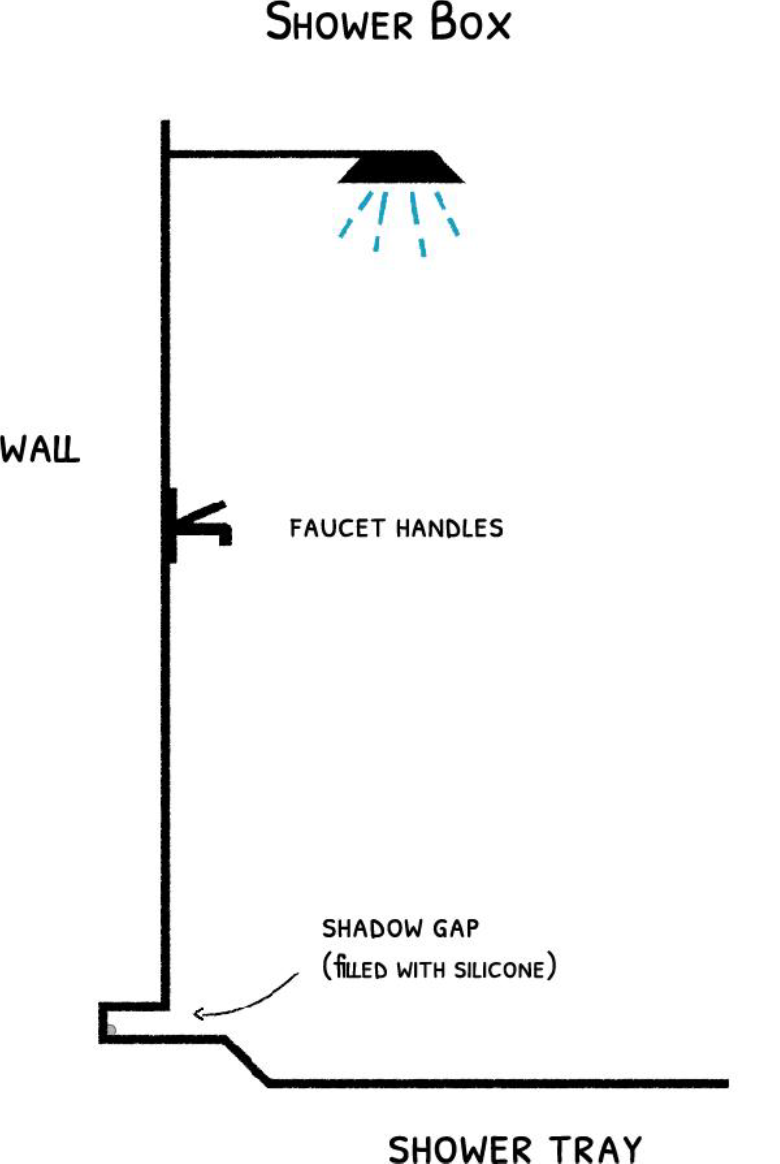
- If you are creating a shower enclosure from scratch then we recommend the creation of a shadow gap as illustrated below. This can be siliconed after waterproofing is complete and before the final soap or wax is applied. When designing the shadow gap, it is important to make sure that the wall’s surface falls inside the shower tray, so that the water does not stagnate at the point of contact between the two.
- Our recommendation for a moisture resistant construction board is Fermacell PowerPanel H20 board. This is an advanced water resistant cement bonded board ideal for walls, floors, and ceilings and also an ideal render carrier board. It’s specifically designed for use in damp areas.
- When you have completed your application of plaster and it has been waterproofed (but before it is waxed or soaped) run some silicon round the opening of the removed fittings before they are refitted. Apply silicone behind them when fixing them to the wall. It is sufficient to put the silicone in the upper arch of the fitting. It is very important that silicon is applied after waterproofing but before waxing/soaping. Wax and soap will throw off the silicon and cause it to peel away allowing water ingress and ultimately staining and mould to form.
- Always use an anti-mould silicon.
- If you need to plaster over tiles then you should use Gap Levelling Plaster (GLP). This is a plaster with low shrinkage and high adhesion. Because of this quality, it is used to fill gaps between tiles in walls and floors, before applying Pastellone or other plasters. Moreover, since it is very adherent, it can be used as the first layer on very smooth surfaces, such as marble or tile floors, before applying lime or cement-based flooring products. If GLP is used, no sanding of the tiles is needed: just clean the tiles to remove grease and other contaminants before application.
WATERPROOFING - We supply 2 forms of waterproofing material and they are similar in the way they are used – one is a silane and the other is a silane/siloxane. Here is a generalised guide to the use of this type of material, but please refer to the product technical data sheets for more info.
▪ Finish your plaster and leave it a minimum of 3 days to dry. If it is a small, enclosed space allow more time to dry. It is essential that the substrate is dry, because waterproofing relies on a chemical reaction with dry silicates. Damp substrates will not react properly and the treatment will fail. If there is little air movement, then improving ventilation will help – consider the use of a de-humidifier or fan.
▪ Apply the waterproofing in 3 coats wet on wet starting at the bottom and working up. You want to ensure that at each stage the surface takes up as much of the material as possible – you need to saturate the surface but not so that it runs down the walls after application. After applying the third coat, wait till the surface starts to dry and watch for and remove any dribbles that might come out of tiny pores in the plaster.
▪ The surface must then be allowed to dry and react for at least two days. During this time, it is essential that the surface is not exposed to any liquids or elevated humidity. Ensure good ventilation whilst drying. After allowing the waterproofing to dry you can apply the silicon sealant, masking the surface so no smears of silicon get on the surface.
▪ Then wax or soap and you’re done!
Further information regarding construction and substrates can be found in our Specifications and Recommendations for Substrates sheet.
Whilst every attempt has been made to ensure the accuracy and reliability of the information contained in this document, the information should not be relied upon as a formal specification.
It is the responsibility of the user to test the full system on the intended surface to ensure that it is suitable for their requirements.
All orders are accepted subject to our Standard Terms and Conditions of Sale which can be viewed on our website.
©2021 Whitson’s Ltd – All rights reserved